Two years ago, I gazed at beautiful, new cabinets and dreamt about the day when I could create the kitchen of my dreams. Instead, I went to my Good “Enough” Plan B, and knew that updating my knobs would suffice until new kitchen cabinets came further up on my budgeting list. Yet, even when I priced out new knobs, I knew that still wasn’t an option, so I decided to spray paint my cabinet knobs and it was more than a Good “enough” thing, it was a great thing.
Two years have passed, and I though it was time to give you an update on how the knobs are doing because I highly recommend this quick and easy DIY update. The inexpensive $1 store paint has held up perfectly. I am still amazed. The others, I just recently repainted because they were all starting to show lots of wear. I have been thinking of why some held up so well, while the others didn’t. I know it’s the not the quality of the paint, because Rustoleum is my favorite, so the only other factor would be that I painted the silver ones on a muggy day, and then it started to drizzle. Even though they barely got wet, they did get wet, so I know that had to be the difference.
I have since spray painted many other knobs, and while it’s not a fool proof forever fix, it’s a wonderful option.
I give it my 100% Good “enough” Things seal of approval!
Continue reading my original post below for all the details on this frugal DIY wonder.
There is some great feedback in the comments about an easy way to to “hold” the knobs while painting.
During my recent painting adventure, many of you saw my kitchen vlog post where I painted my basic white laminate island tourquise, but let me show you another quick, cost effective way to liven up your kitchen cabinets for less than $5.
Why, oh why, did it take me so long to spray paint my kitchen cabinet knobs (or “pulls” for the decorators out there)? It took all of thirty minutes and makes such an amazing difference. Seriously, if you have those infamous 80’s and 90’s “in your face, gold brass knobs” take a minute and update them. You’ll add a fresh, perfect punch to your kitchen, bathroom, bedroom….where ever you have outdated hardware (and trust me, my whole house if full of it).
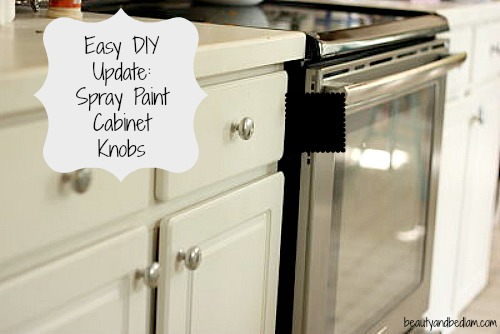
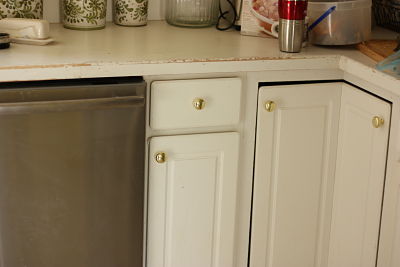
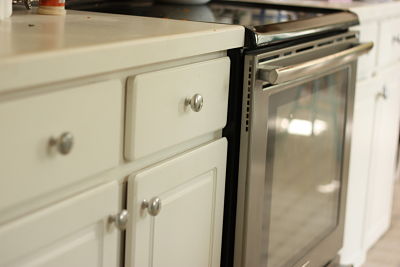
Since I had my appliances installed, the brass knobs were really fighting with the stainless steel. Having matching stainless has tremendously changed the whole look of my kitchen. It has pulled everything together beautifully, but now my old gold knobs really clashed. Purchasing some cool, new alternative hardware is a amazing way to make your cabinets feel new to you. There are so many fun choices, but I would still need to purchase forty kitchen pulls making it a small investment, but an investment non the less. By just giving them a quick coat of chrome paint, I revolutionized the feel of the cabinet for less than $5. Yes, that is the kind of frugal fabulousness I love.
Here’s the before…you can see that I am sanding the top molding for a quick paint touch up. With the dishwasher and appliance cabinet right next to each other, this area gets a lot of finger touching. 🙂
I used Rustoleum chrome for the job, but I encourage you to ask the paint professionals what brand to use on hardware. They have special stuff, I am sure. 🙂
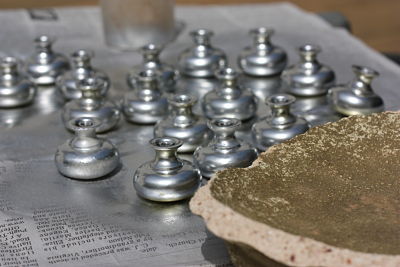
If you don’t have a garage to protect your pulls from the elements, I highly suggest you use something to keep the paper from blowing up and sticking to the paint. Hmm…ask me how I know.
I also warn you that if you do this on a windy day, there’s a chance that a few bugs, dog hairs or anything else may blow in the direction of the project. Again, ask me how I know.
Rushing a paint projects has been my MO. Never again. Make sure the pulls are totally dry or when you go to screw them on you may get small finger prints embedded on the still tacky wet paint. Again…ask me…:)
So why procrastinate? It’s amazing the difference. And yes, I am just loving how it matches my oven almost as much as I relish cooking in it. It’s been a true treat.
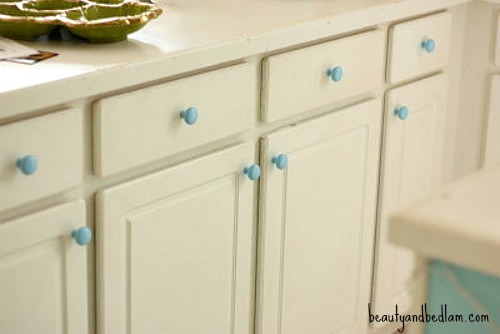
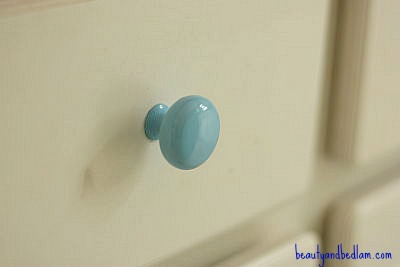
If you watched the vlog, I shared how my daughters begged me to paint the knobs blue for Easter. Why not? When changing the look is that easy, it was fun to be able to make them happy with such a little thing. Some of you suggested keeping the top cabinet pulls silver and leaving the bottom ones blue. I may play around with that. Thanks for the great ideas.
So what exactly did I do?
I took all the hardware off and washed them. Then I lightly sanded the tops. If you are doing larger pulls, then hit the whole surface….I didn’t. 🙂 Next, apply a clean metal primer in order to have the color adhere the best. Let that dry and then spray on your chosen color.
I am sure that I will need to touch these up every once in awhile, but I have a feeling changing out my hardware could become a new addiction. The key now is to wait…and let it cure for up to three days. I did not do that and I regret it. The ones I “rushed” felt a bit tacky. The ones that sat patiently are perfect. Applying a final coat of polyurethane coating to protect the pulls from wear and tear is recommended by good painters (which I am not.) If they are just “for show,” then I would skip it. Like I said, rushing a painting job is no longer my MO (but it was for this project). Again, ask at your local Home Depot or Lowes for the best kind to use if it’s going to get a lot of use. They’ll tell you if the polyurethane is worth it or not.
This project, along with “shopping the house with some spray paint,” now becomes one of my best recommendations for what to do in less than an hour. Scour your house and unscrew any old hardware you fine. Go splurge with a “Lincoln” and have some fun making things new (to you.) This is just another great way to decorate on a dime. 🙂

THANK YOU!! This was just the encouragement I needed. I have icky brass colored knobs on my white cabinets, and my kitchen really would benefit from chrome. I have visible hinges though…guess I’ll have to figure out how to paint those and still make them work. I’m guessing I’ll have to do one cabinet at a time….
@Amanda @ Serenity Now, just start with the handles since that goes so fast. Then, you can worry about the hinges. 🙂 It would be time consuming to take all the doors off, but you could paint them carefully with a brush.
They look amazing! You did a great job!!!
Wow – they look amazing! And I must say, I’m really diggin the light blue knobs. 🙂
Jen, these looks GREAT!!!!
Jen, that is beautiful ! What a brilliant and easy way to update cabinets for pennies !
Kate
Um…I now want blue knobs. But not just for Easter. Those look SO CUTE!
What a great idea! Please let us know how they hold up.
What do you think about painting the hinges of doors? All our hinges are gold and icky, but I’m not sure if the hinges would still work well when painted.
@Stephanie, My kitchen cabinets have very old hinges, too – brass ones from the ’70s. I was wondering the same thing and then I noticed that my bathroom hinges are the exact same as the kitchen… but they have been painted white (I am sure it is cabinet paint, not Rustoleum). They work fine and do not even show any wear and we have lived here for 12 years so I know they were painted before we moved in. Hope that answers your question.
The Tiffany Blue knobs are ADORABLE! Happy!
Love how you changed the whole look of your kitchen with just painting the knobs! Great idea!
The knobs look GREAT Jen!! I spray painted some hardware on my daughters furniture right after she was born and it came out great and still holdign up great! It was an old piece of furniture (that I LOVE) from my husbands grandmother, but it was a yellow blonde color. So I spray painted the entire piece white and did the hardware right along with it!
The silver knobs look great with your new appliances!! I would love to see you spray paint the island knobs black up against the beautiful new blue!!! 🙂
Kristi
Jen, you are so spontaneous. LOVE that! A couple of knob/spray painting tips I’ve learned the hard way: With no garage availability, painting into a big box tipped on it’s side works GREAT. Also, I’ve hung knobs on the end of wire hangers (take apart the hanger and bend it in half and you can stick the end of the hanger into the opening of the knob). Suspend the bent hangers from a rope hung ‘clothesline-style’ and spray away! (don’t forget to protect the floor, if necessary)….then you have access to all sides of the knob and may have less temptation to touch and leave a fingerprint before they are completely dry!
Hi there, those look GREAT! I see that you homeschool as well…we have that in common. 🙂 Just wanted to say HI!
I have one word for this post. F.A.B.U.L.O.U.S!!!
I’ve wanted to change my kitchen hardware FOREVER. My hesitation is from the fact that our cabinet hinges are gold as well. While painting the knobs may be a quick fix – what to do with the hinges keeps me very perplexed.
Any ideas?
I think this is a great idea! I love me some spray paint:) Have a great weekend.
I can’t wait to see them red and green at Christmas! And maybe black and orange in October? Red, white, and blue in July?
I love it.
I enjoy reading your stuff so much. Even more now that my husband and I are on a budget (going on two weeks now…LOL.)
Thanks for all the awesme ideas.
Blessings on your life.
Love the knobs! Coordinates nicely with those great new appliances.
Another idea for when you are spraying them. Use an old piece of styrofoam- (re-used from a new items packaging). Stick a bunch of nails through it and put all the knobs on them. It keeps them still while spraying them. When you are finished, you can carry them all together back into the kitchen. I have 42 knobs in my kitchen. Ask me how I know…..;)
I really enjoy reading your blog.
I have been scaring hubs lately when he catches me with a can of spray paitn in my hand. With us moving soon, I am giving things one last minute chance to a gazillion items to see if spray paint can give it new life. And of course it always does. I had this stone fruit I never really knew what to do with. Spray painted them white and they look fab! But Jen, as usual, your creative mind inspires. Re-spray paint? Brilliance! Now I may color my fruit! Off to brain storm. Thanks friend!
I came across your blog after searching the web for hours for a way to liven up our kitchen in the 1966 rental home we are about to move into, 11 days to finish the “revamping”. Specifically I am interested in updating the cabinet & drawer pulls. Ive sifted through many Google pages looking for a way to paint the hardware, as I have had it in my head that I have to be able to do something rather than buy new!turns out, 90% of what I have read have been folks saying it would become “tacky, or gooey” later if you used spray paint or “why be cheap, just buy new”. Well frankly, we cannot afford to do that, we are on a very tight budget, but want nice (looking) things. Thus my excitement when I can across your page, yay!!!! Your photos have put me in awe! I knew it was possible!!!!! I am hoping you can give me MORE detail as to the specific steps/ products needed to be successful in “spray painting” my kitchen (& maybe bathroom too) hardware. I am so excited, I am now a subscriber!! Thanks!!!
@KahrissaMae, Thanks for your sweet words…let me get back to you about the tacky feeling issue because I do see that as a possible problem. Ask at Lowes for specific spray paint for metal. There are so many knobs that are not heavily used knobs and I’ve had them painted over a week and I don’t see a problem. But I have used two different kind of paints and the one I used on the knobs that get wet 5-6 times a day from my kids, do feel a bit sticky, so I’m going to dive into how I can address that. I still don’t regret painting them because they look amazing. For literally a few dollars, I can deal with having to respray just a few of them. It takes about 10 seconds to unscrew them. So, I think it’s in the paint choice because one is fine….once you decide on a color, I would just ask the paint guy and he’d be really helpful. I went with what I had on hand. 🙂
@Jens, Fabulous. I am going to Lowes & am planning to do them tomorrow; I will take to the paint guys! Thanks again!!!
I want to say… Thank you!!! I’ve just rented a home that needs some major updates and I really don’t want to put a lot of money into it. I have been staring at these ugly golden knobs for weeks, wrestling myself mentally on what to do. I was even thinking of mod podge fabric overlay. I’ll have to try it on one or two, but this is awesome for the gazillion that I have in the kitchen! I wonder if a mod podge overlay on top of the paint would keep it from getting tacky?? I’ll have to try it out. Thanks again!!
As an update to these knobs, the ones I did with the $1 paint are still perfect and yes, still blue. 🙂 The other ones have worn off, but honestly, for the small amount of time it took and small cost, anyone can just repaint them again. I think they were tacky because I didn’t give them time to cure and they got a bit damp outside. Have fun!
I have an idea that may help next time. Use a piece of foam craft board ($1.97 @ WM) to screw your knobs in. It will hold them in place while you paint.
I’m trying to do a bit of work before I refinance the house and those big brass knobs were screaming “I need a kitchen remodel!” This is a great quick-fix.
Just wanted to mention to those planning on painting the landlord’s cabinet knobs…be sure to ask for permission first! I’ve had some antique door knobs “refinished” by well-meaning renters and it just broke my heart (they were ruined & $100 each to replace!)
I was looking up whether this could be done. I have cabinet pulls from the 50’s and they are looking tired, but I can’t afford new ones. I’m in the middle of repainting my whole kitchen and sewing a new valance and sink skirt. Can’t wait to try the knobs in a few days… Thanks for the tutorial.
I LOVE this idea. I have the nasty gold 3″ pulls with the white in the middle of them. I think I am going to try to spray the gold and modge podge the white with a country red checked fabric to match my hand-sewn curtains. I can’t wait to see how they turn out. I also have stainless appliances and can’t wait to get rid of all the outdated gold in my new house!
I’ve been looking for inexpensive ways to update my early 1990s kitchen and came across Rustoleum products, but didn’t realize they also had metallic paint. Yay! This was exactly what I was looking for to fix the brass knob eyesores in my kitchen exactly as you described here. Now that you’ve shown us how easily this dramatic change can be made, I’m off to the hardware store today to start my project. Thanks so much to everyone who shared tips.
BTW, has anyone sprayed this paint on door knobs? I have an entire house full of brass colored door knobs and hinges as well…
I would love to do the same to brass looking light fixtures/ chandeliers and door handles, too. Any tips on tackling those?
You totally can. I have done nearly all my light fixtures, lamps and chandeliers with spray paint. The door handles works well too, but just ask at lowes or Home depot what they recommend for durability. They have come out recently with some better stuff. The cheaper spraypaint is just fine though for lamps and fixtures.
I have completed my cabinet knob project and thrilled with the results. I’m a bit of a perfectionist and have lots of patience, so I’ve provided some notes here to make it easier to come out with a great result. Here are some before/after photos.
https://picasaweb.google.com/113361983789585222068/HomeProjects?authkey=Gv1sRgCJjLzI-ElPbqTA#
I used Rustoleum Universal Metallic Paint and Primer in satin nickel. It has a matte finish with some metallic sparkle in it.
It took me a total time of 1 hour to complete the work (removing the 35 knobs, sanding, wiping, spraying 2 light coats of color on each side, and 1 coat of lacquer finish, reinstalling the knobs), but over the duration of 1 week, allowing for plenty of drying time between coats. Start with the bottoms, then flip and do the tops.
Really Useful Trick – Use a piece of styrofoam large enough to act as a tray for all the knobs (see photos in above link). Then take some wooden kabob skewers ($1 at the Dollar Store for a bag of 50), cut each skewer into 4″ lengths, and poke them into the styrofoam to act as a pedestal to hold the knobs. They are the perfect size and will hold the knobs in place so they don’t wiggle. Space knobs so they don’t touch, then spray tops with light even coats. Do not overspray or the paint will drip over the edges and cause little blobs under the knob.
The paint has a very strong odor, so spray outdoors or in a very well ventilated area, wearing safety glasses and mask to prevent the mist from getting into your face. To avoid the bugs/pet hair/dust balls getting stuck to the knobs, cover the styrofoam tray with an inverted cardboard box poked with small holes for air circulation, and big enough so it doesn’t touch the knobs in the tray.
Thanks so much for this quick, easy, economical and dramatic update! I’m loving it and plan to do my bathroom accessories and light fixtures next. The door knobs will be a lot more work – I have about 20 doors times 2 knobs per door…
I am a huge fan of spray paint, but I don’t like knobs spray painted unless the knobs are just down right nasty (brass). You did a good job and it looks very cottage-y and I love cottage-y. I just recently spray painted on old wooden paper towel holder and some old ugly candle stick holders I picked up at a yard sale. They look so much better and clean. I also just looked through an HGTV magazine where they sprayed a chair bright glossy yellow, super cool!
I’ve painted knobs before, too! Such a simple thing = big results!
this makes such a difference! beautiful!
There is hope for my pulls! YAY!
What about the hinges on cabinet doors. They are discolored after years of wear. I changed out all the door knobs for the front of my kitchen cabinets, but not the hinges. Can those be painted also?
Thanks,
Connie
So, I came across this AFTER my cabinet/drawer project and here are a few more tips. I had actually changed out my kitchen hardware when we bought a new house (only 3 years ago), what I had purchased was brushed nickle—loved the look! Did NOT love the old worn light brown wood cabinets though, and of course, replacing them was out of the question. I found a product called “rustoleum cabinet transformations” (on-line or lowes…starting at $75.) and re-did my kitchen cabinets in a glazed white. Well, I really wanted black hardware on these, so instead of spending more money, I painted my (newish) hardware black—LOVE LOVE LOVE the entire look!!! I only wish I had waited to replace the old hardware first. Next kitchen project will be “rustoleum counter transformations” in black onyx…basically, for about $300.00 I have a brand new looking kitchen 🙂
**btw…I used upside down egg cartons and pushed my hardware through them to paint…
**spray primer, rustoleum black paint, matte finish top coat…let dry completely between
coats, and I agree with allowing plenty of time to cure, a week was plrnty of time
**I also had to take ALL of the hardware off, so it was a cinch to paint the hinges as well
YAY, so glad you shared your experience. I will have to update this post with everyone’s stories.
My friend just did her cabinets with the same Rustoleum transformation, and even though she said it took awhile, she LOVES it and is just thrilled with the results. So very fun. Doesn’t it just make you so happy whenever you look around and it? Makes it even better that you did it yourself.
I remodeled in 1994 with brass throughout. Am I weird that I still like it? I am a grandmother and so is my decorator/friend. She says that trends change—they went from dark copper to stainless to brushed nickel or whatever over the years. She says that now brushed nickel is “in”, but that will change at some point, so people will want something new.
Believe it or not, I am still fine with my brass hardware! But now I feel weird that I still like it!
We are finally doing a remodel, and I don’t know if I will update the hardware or keep my “down right nasty (brass) knobs.
I think if they are quality brass knobs and you like them, keep them. Mine were not good ones and after so many years of use, they showed such wear and just looked bad, but I agree with your decorator friend, trends come and go. It only matters if you like it. 🙂
this is so cute, I change my table setting for the seasons but not my cabinet knobs. LOL I must say I am doing the same thing, but I am painting the cabinets and putting knobs on for the first time. I found some solid iron knobs at an antique store, but once I painted them they look like little trash can tops. A friend suggested I try antique painting them. so that is next.
I spray painted the knobs on cabinet doors in our den. It lasted a good 10 years! Time and (very little) $$ well spent.
Hi! I heard that he polyurethane was because minuscule bits of paint could rub off on your hands and get baked into pies and cookies etc. It’s for health reasons.
Gotta be careful with the Polyurithane. It will yellow and distort your lighter colors.
Great helpful post! I just bought some vintage 50’s Chevron knobs, and the Chrome is coming off. Cant wait to clean them, and spray them for my vintage trailer!
I am wanting to remove all hardware and hinges to repaint, I like the bronze or gold look, these are 30+ yr old pulls and knobs so I really want to keep them, these have degraded so much over the years even with cleaning are now a blackish bronze color is it even going to be possible to clean them up enough to repaint? and what would be the best course of action…. and products to use
@Sherri, You will be amazed at the results you can get with just cleaning them with very fine steel wool. We purchased a home built in 1918 that had wonderful brass window pulls on all the windows. However over the years they had become darker and even had lots of paint on them from someone not taking the time to remove them before painting the wood window frames. It is tedious work but we removed them and made it out winter project while sitting In front of the tv. We each had an empty shoebox with pulls and steel wool in it. We would just rub and rub on the pulls and they turned out amazing!
Margaret – thanks for sharing. It’s always so great to hear how other people tackle their DIY projects. Great tip. 🙂
Love the cabinet doors as well as the back door. Am so going to do this! What colors did you use? Undercoat as well as the top coat? And is the “undercoat” simply one coat of latex? Thanks
Well… I know who’s getting Christmas-y kitchen door knobs this year… ME! XD Hubby is going to flip, worth every penny.
Thanks 😀
Carly x