The final days leading up to Christmas holds the greatest tendency to make impulse purchases.
Don’t do it! Oh, I know it’s so hard to resist, but let’s get creative!
Are you trying to think of last minute gift ideas, but your pocket book is stretched to its limit and pressure is mounting?
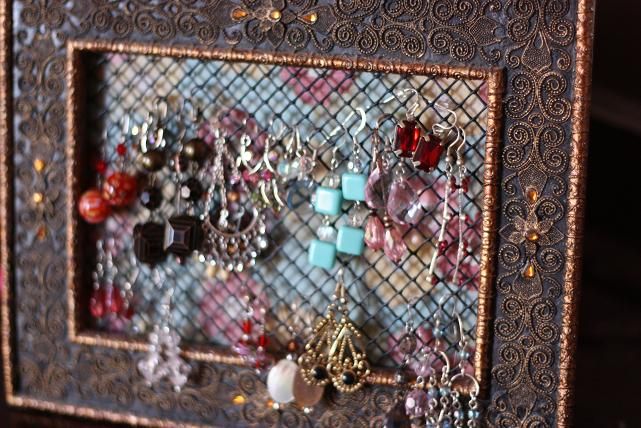
My “Do it Yourself” Earring Organizer will take minutes and only pennies out of the wallet. It’s so simple, and the creative possibilities are endless. Most of you can probably put your hands on unused frames if you “shop your house,” and if you’re like me, the huge amounts of unused scrapbook paper from years of promising the completion of those baby books is just a closet away.
If you don’t have any frames, run to your local Goodwill. I can guarantee there will be plenty. Pick up a solid wood frame and spray paint it to match the recipient’s decor. What a unique and personalized present that any woman, young or old, will appreciate (well, unless she doesn’t wear earrings.) 🙂
I will do a detailed post on the many options in making these, but here’s a quick and easy method.
Take the back of the frame and place the scrapbook paper under the glass just as you would the picture. Then place mesh gutter netting over the glass, put the frame back on and close it. Voila! It’s done!
I have too many earrings, yes, I admit, so this small frame is not big enough. I just bought a fabulous wooden antique frame at the thrift store and I am painting it white. It’s a 11×14 size and it will look wonderful on my bedroom wall hung by a gorgeous ribbon. The possibilities are endless.
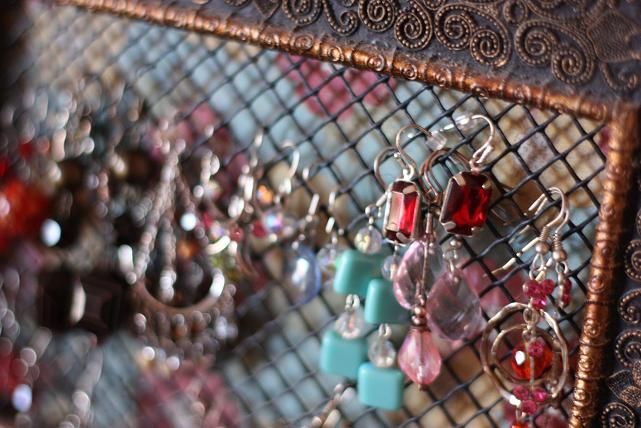
Sometimes frames do not include a full backing. In that case, I recommend using a staple gun to affix the screen.
If the frame is thin, the staples may go too far through the wood, then just use a hot glue gun.
Here is another option for netting – use an old window screen that you may have lying around the garage.


This is definitely a little girl look I found while browsing. The frame is a wooden Dollar Store frame, so this would be a really fun project at any time of the year for a little girl get together.

I am so excited about the Clip Board project that I just finished. It was also super quick and cost less than $1. (Do you see a theme with my life lately? :)) This clip board takes my Family Manger role to a whole new level. I am going to keep my miscellaneous “To do” lists, notes, etc. all on here because I have a terrible propensity to leave little notes everywhere.
The clip board that I made took less time that typing up this post, but you can go to town embellishing it with fringe, die cuts, ribbons, pictures, stickers etc. for a truly amazing effect. The wonderful thing about this project is that you can use scrapbook paper, wallpaper, wrapping paper or even thin fabric – all things you probably have on hand right now.
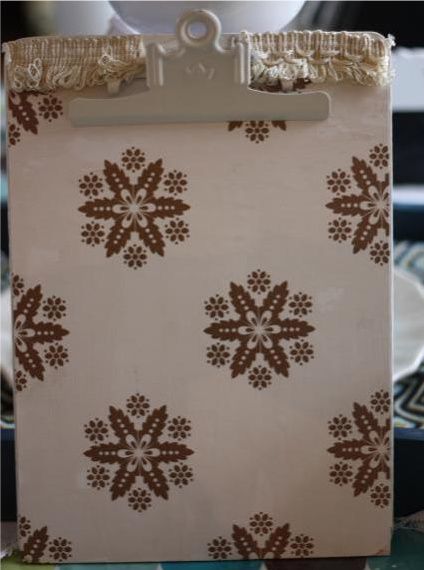
I was thrilled when I found a stack of ten clip boards at a yard sale for just $1. Again, I am going to devote a whole post to the amazing possibilities that abound with this new found project (including a Pottery Barn inspired organizational system). For now, let’s just get it done for Christmas.
Pick your favorite spray paint or acrylic paint, if that’s all you have on hand. First, do a primer coat since the spray paint does absorb quickly. If you’re using scrapbook paper like I did, you don’t need to paint the surface thoroughly since you will be covering it.
Paint the handle last…trust me on this. I had paint on my fingers for days. Pinch it, and paint under the handle first, finishing with the handle.
Cut the scrapbook paper to size, and glue with your choice of adhesive. I used Modge Podge first and let it dry, then finished with a top coat over the paper. If you’re using it in the kitchen or are adding pictures, the extra protection is highly encouraged. Modge Podge is the trickiest to work with since you need to make sure you get out the bubbles. Have a brayer or scraper ready to run over your paper to help eliminate any air bubbles.


Isn’t it so much fun to see all the possibilities?
Enjoy some quick, easy and creative last minute gift ideas that won’t put any extra dollars on that credit card.
Trust me, the temporary happiness brought about by opening one more present will not make up for the distress felt when that bill rolls around in January. You’ll thank me later. 🙂

REALLY like the earring organizer idea! Thanks for sharing that!!!
I’ve seen the earing organizers before but that first one has to be my favorite! It’s so pretty I’ll have to make one for myself now!
Love the earring hanger! (I can’t wait to make one for myself and then if it turns out as nicely as yours I will make some for gifts.)
I adore those personalized clipboards. I am a preschool teacher and those would have made adorable gifts to give to my fellow staffers. Ah well, there is always next year!
And how much would coaches and dance/gymnastic instructors love themed ones as gifts?
🙂
I love both of those ideas! The clipboards are especially cute and I could use one! How did you make the pocket? Is it durable? That might solve our mail problem!
P.S. I was linked to your blog a time ago via MSM and I was inspired to visit a thrift store or two. I bought brown corduroy pants, Levis, a red cable knit sweater (which I wore for our family Christmas photo), green/white button-up, coral long-sleeve knit top, and a bread machine for $16! I think it was a good first visit! I kept looking for a vest after I saw your orange one! Thanks!
Wahoo, Jen! Congrats on being featured at Money Saving Mom along with MEEEEEE!!! (Can you tell I’m excited? Hee, hee!)
LOVE your projects. I NEED to make one of those earring holders for myself! And, how about a chalkboard painted clip board? My brother-in-law wants one for Christmas for his basketball coaching duties. Thankfully, I bought a clipboard for only 10¢ at a garage sale this summer!! LOL!
Do you have a paper template for getting the paper around the clip on the clipboard? It looks like you did it all in one piece vs. cutting two pieces.
I didn’t have a template. When you hold the handle up on the clip board, you can slide the paper up and under the board. It won’t go all the way to the top, but that’s why you spray paint it first, so that it covers the excess. Hope that helps. 🙂
I made a couple of those jewelry boards myself awhile back. They are very fun to do and such a great idea for those with lots of jewelry!
You can see mine here
http://perfectlyimperfectjenn.blogspot.com/2009/11/friday-snippets_13.html
and here
http://perfectlyimperfectjenn.blogspot.com/2009/11/i-love-to-create.html
So cute – aren’t they fun? Thanks for sharing. 🙂
I made clipboards for my daughters and their friends. I got mine at Walmart for .97 each. They have a bar instead of a solid clip. After I modge podged the scrapbook paper and their names, I tied ribbons to match the paper around the bar. They are so stinkin’ cute!! I wish I had more time and I would have made them for the teachers. Definitely next year!!
These are great ideas, Jen. Just think–the time it would take to drive to the mall and find a parking space could be used to create one of these! Not to mention the actual time spent IN the mall!
I thought of you last night as I was wrapping gifts for the needy family we adopted for Christmas. I just brought all the wrapping supplies into the living room and turned on “Holiday Inn.” The living room is a piece of bedlam right now, but the gifts look beautiful!
So cute! I love Mod Podged clipboards. They are fab.
Thank you for the crafty ideas!!!!!!!!!
Now that is some CUTE stuff!! I especially loved the larger earring organizer hanging on the wall with the red ribbon. NICE!!! Thank you for the great ideas…..lets just hope I can possibly maybe pull one off.
I love the earring holder frames! You know I’m a birthday-party-planning girl, and I can picture this as a special gift or party favor when my girls get their ears pierced. I feel it’s a rite of passage for a young lady, so I plan to celebrate that special day — although at 5 Mary Ashley says she never wants to get her ears pierced because it hurts too much. That is fine with me now, as I still want to wait until she is at least 10. But I will tuck this idea away until we need it. Merry Christmas!
Great ideas! I’ve got several frames, but no earrings so I’ll have to think of something else to do with them!
Love love love the earring holders!! Wish I would have seen this before I nought gifts for all of my girlfriends. Everyone is getting this for birthdays this year!!
I created an altered clipboard a while back and thought you may be interested. Here it is:
http://scraphappychelsey.blogspot.com/2009/09/altered-clipboard-w-new-black-white.html
Ooo, I’m loving that earring holder photo frame idea. I’ve recently been trying to figure out what to do with all of my earrings. So perhaps not a gift, but that could look fab in my bathroom!
Your DIY is DE liciously lovely!
Have a merry and bright Christmas.
I made similar earring holders when I was in college, but I used embroidery hoops I found on clearance at the craft store. I glued the screening in between the hoops just like you would a canvas, so it stayed put very well… then I used a fabric ruffle to decorate around the outside.
On the first design, I’d be concerned about post earrings… it looks pretty easy for the French hook design, but how do you get the backs on for a regular earring?
Gorgeous designs, and I LOVE the clipboards!!
How funny — I just blogged about this a few weeks ago! I made mine with cross-stitch fabric instead, which solves the problem with post-back earrings and gives a softer look, if that’s what you’re after.
If you want, you can check out mine here: http://thewholeloaf.wordpress.com/2011/12/07/earring-holder-masterpiece/
Thanks for the post!