
Decorating on a Dime takes time, tenacity and tutelage from those who’ve gone before you. Mix that with a little imagination and you are raring to go with any aspect of your home.
Yes, squashing the hidden retail shopper inside you is necessary if you want to be set apart from “Decorating like a Designer” and “Decorating like a Designer on a Dime.”
I’ll admit, precious time is spent waiting patiently for just the right piece to come your way at yard sales or thrift stores, but when it does, the thrill is so worth it.
So what can we do right now to get those creative decorating juices going without spending much, if any, money?
Let’s start with some quick and easy centerpieces by shopping our house and cabinets. Then if we still need some pizazz, we’ll hit the local thrift stores.
Often, I don’t have time to decorate for every holiday, even though that is my goal. I find that the easiest way to vary my otherwise stagnant decor is to frequently change my centerpieces. It’s fun to look in my cabinets and see what’s hiding. And for my non designer eye, it’s all about layering – layering the textures and height of the objects I’m using.
Often when I yard sale, I look for items that I can put together into my tablescapes. (Did you miss my ‘What in the world is a tablescape’ post?)
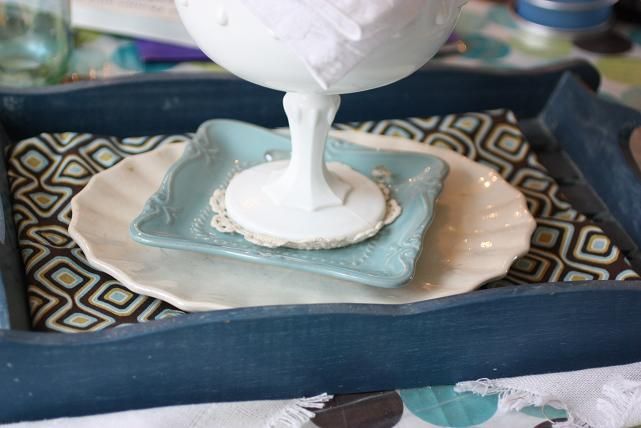
This $0.25 tray that the Nester found at a yard sale now ties together my kitchen table attire perfectly. Layer some yard sale fabric scraps and thrifted plates to give height to my nesting bowls and I have a perfect place to put my napkins for the night. (I wish I had taken a pic of the whole table. You wouldn’t believe how well the fabric matches my tablecloth. I love when that happens.)

Literally minutes before my guests arrived on Christmas Eve, I wanted to add a bit more elegance to my dining room table. Thinking through a tablescape plan didn’t happen, but with the help of my son, a scissors and our holly bush, I pulled together a quick and easy centerpiece using what I had on hand.
Again, it’s about the layering.
Remember my $0.50 yard sale tray? Well, it was smaller than I wanted, but I only had minutes to spare, and it was handy. 🙂

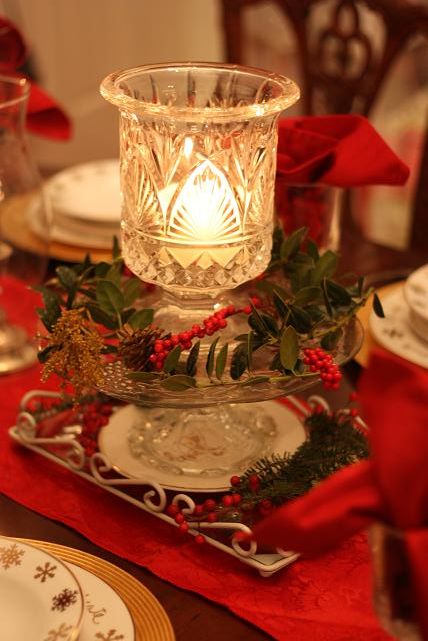
I started by placing the tray on the runner, added a small salad plate as the base for my cake plate, and then topped the cake plate with a large, glass hurricane like candle holder. Thanks to my son and his quick holly cutting ability, we garnished the table and plates with greenery and fake red berries from a yard sale plant.
It would have been perfect with a larger tray, but “it doesn’t have to be perfect to be beautiful”, right?
But guess what? Eight days after Christmas, this stunningly, simple silver serving tray was 75% off at Target = $3.75. It was the perfect size to finish off this centerpiece… it was worth the wait, even if it was a week late.

(And yes, I took that picture today if any of you were noting the nearly dead holly branches.)

Remember, my blue kitchen centerpiece at the beginning of the post? Well, it was swapped for the Christmas Candy Cane centerpiece and now is heading towards Valentine’s Day decor….this is a sneak peak. It’s not quite finished yet.
(Pssst – that is a different silver tray that needs a new paint job – $1 yard sale. Start looking, you’ll find a bunch second hand.)
The best thing about decorating on a dime with quick and easy centerpieces? Every centerpiece featured totaled $5 or less (that silver tray will blow my budget for next year’s…all the way to $8).
So open up your cabinets, look at your table and see what creative juices you can get flowing. It’s such a wonderful way to add ambiance to your meal time…meal time magic.
Posted at Kimba’s DIY
Waiting for the perfect find does have such a thrill…especially if it’s a “fad” item, you’ll see it in the thrift stores sooner or later. 🙂
@Della @ Della Grace’s Life,
It sure is…I love finding things that were in the retail stores just the year before and you know what the original price was 🙂
Gorgeous!!! I used my regular centrepiece’s glass plate (it usually sits on a gold stand with candles and rocks in it) and put it flat into a normal Christmas wreath I decorated, and put some festive candles in. It worked well for being able to re-use some items, but make it Christmasy as well! 🙂
How do you manage things like this with young children (or your dog – lol)? If I set up a centerpiece like that, everything in it would be broken by the end of the first evening. But it seems like all the pretty stuff is breakable. 🙁
I’m not the only one with small children, and everyone else seems to manage to decorate their houses nicely, so I know I must just be “missing it” somewhere. Help?
You are sooo my cup of tea! I adore your ideas! Thanks so much. Now I have ideas for throwing together a centerpiece for my island with all this time I’m trying to kill before I can bring my husband home on Sunday 🙂
great ideas. thanks for sharing!
So cute. I love your ideas! I am not a very patient person but when you get a good deal it’s all worth it!
XOXO
Jen
Everything looks so pretty, thanks for the ideas.
I love when simple things like this just come together and look beautiful! Thanks for sharing your great finds:-)
Beautiful centerpieces! Thanks for sharing the ideas!
I love it — thanks for sharing!
Great ideas! Sometimes we overlook the simplicity of using what we have on hand, and really who needs to be going out and buying new stuff all the time anyway? Honestly, I don’t know where I’d put new stuff. Thanks for sharing these cool tips!
All of our centerpieces must be ‘schoolproof’ since our dining table is our schoolroom too. Trays are wonderful since they can be taken off at a moment’s notice for spilled milk or bigger school projects. While I would like to try for some more height, since it lends so much grace to your arrangements, I am leery. My current winter centerpiece is a shabby white tray filled with prickly dry brown sweet gum balls from our tree, scrolly white metal snowflake ornaments, bits of pine greenery (faux), and a scattering of ‘snow’. In the center, I placed a chunky white candle in a tall clear glass and filled it with more ‘snow’. The kids like it and so far it has not been knocked over or spilled on! I shopped the house for every bit of it!
Yes, our dining room table is our school table as well. It’s funny right now because that elegant centerpiece is surrounded by so much stuff you wouldn’t believe it…your winter centerpiece sounds beautiful. 🙂
I love finding great deals and it’s even more fun when those deals come from your own cupboards! Thanks for the great ideas!
Looks amazing! You have such a creative eye for decorating! (That’s not me, so it’s good to get ideas on how to think outside the box). I found your site via a post at Life as a Mom. I’ll definitely be checking back often.
Jenn
This looks great! I always notice other people’s centerpieces, but never seem to feel creative myself. Thanks for the good ideas!