Hearing that a post has inspired both creativity and frugality in one of my readers delights me to no end.
When Cara emailed me that she had some Pottery Barn inspired bedroom decor and had conquered a Pottery Barn chandelier for under $10, I was delighted that she shared the pictures. Her ideas can be fitted to any number of varying decorating tastes.
I am in the process (yes, the process has been stalled on quite a few occasions) of finishing my girls’ room with a PB inspired butterfly theme. I can’t wait to show you how an entire room makeover can happen for under $100 (with furniture).
This butterfly chandelier is a wonderful start.

Considering that this gorgeous Chapiz Chandelier is selling for $129 right now, I am guessing, the butterfly one would not have fit into my frugal bedroom decor category.
Supplies:
- Embroidery Hoop (only the solid hoop is needed; the hoop I used is about 14in in diameter)
- Twine / String
- Ribbon (1/2 inch or so width)
- Ribbon (thin)
- Beads
- Card stock Paper (I used 3 colors)
- Butterfly Template or punch (I wanted my butterflies to be about 3 inches wide – larger than any of my punches – so I used this template from Martha Stewart.
- Hot Glue Gun
Ribbon Punch (optional – this is a tool I use for scrapbooking that punches out two slits for ribbons to feed through)
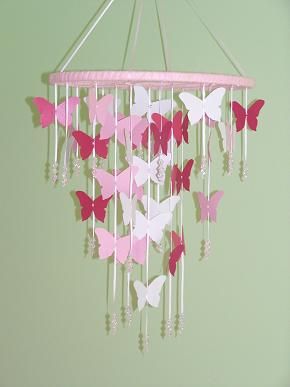
(1) Take the embroidery hoop and tie a grid across it with the strings. I chose to do three strings in each direction. (You can see the grid in image directly below). Make sure to tie the strings tights.
(2) Using the hot glue gun, wrap the ribbon around the hoop until it is completely covered, periodically gluing it so that the ribbon stays put. Once the hoop is covered, add two ribbons criss-crossing for hanging.
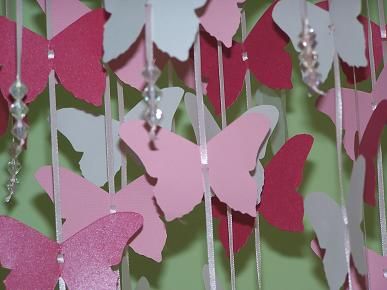
(3) Cut out your butterflies. I opted for 36 butterflies in dark pink, pale pink, and white. Cut slits in the middle of the butterflies just wide enough for the thin ribbon to feed through. You want a tight fit so that the butterflies stay put on the ribbon. I used a ribbon punch, but you cut also just use scissors. You could also try using an adhesive if you have trouble getting the butterflies to stay, though you might want to wait until the end and the butterflies are exactly where you want them
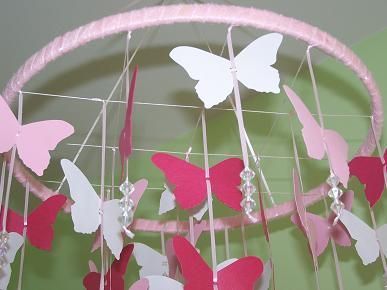
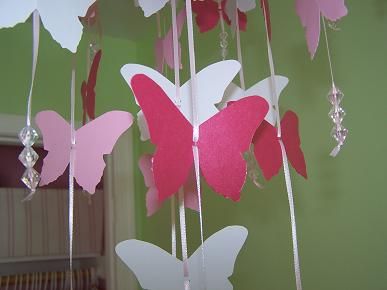
(4) Start assembling the butterflies on the thin ribbon, threading a few beads on the bottom to help weight each strand. You can add as many butterflies on each strand as you like for your design. For the chandelier effect, have a longer string in the middle and gradually have shorter strand toward the outside. Based on the size of my butterflies, I opted for four butterflies on my center strand (tied to the middle point of the grid). Then I had 4 strands of three butterflies, 4 strands of two butterflies, and 12 strands of one butterfly. I then used to three beads at the end of each strand. As a hint, find someplace to balance the hoop so you can look at the strands as you attach them to the grid. That way, you can play with the length you want. Since I tend to do crafts on my living room floor while watching TV, I brought in two of my kitchen chairs and balanced the hoop between the seats. That let me keep shifting things until I achieved the look I wanted.
(5) After you have attached all the strands to the grid and have everything set, clip any excess ribbon from where you tied the strands and go hang your chandelier
I hope you have enjoyed this beautifully frugal way to decorate your girl’s room. I know I sure did. 🙂
What a smart idea. Looks great!
It’s beautiful, Jen! 🙂 I love the little sparklies. 🙂
Oh that is simply lovely! Beautiful.
My girls have a butterfly theme running through their room (ok- full disclosure- the five month old still sleeps in a cradle in my room… I’m in no hurry to kick her out! ;). My mom did a copy-cat butterfly quilt following a Pottery Barn Kids picture and it turned out so very cute.
I adore this chandelier.
I love it! What a simple, but beautiful project! I just might have to make one of these for my daughter! Cute, cute, cute!
The mobile we have is balls(for our son) so I haven’t put it up. This could replace a mobile and look great!
Thanks so much!
Oh, that is so cute! My girls would love it. I think they could help me too!
Very cute!!! (I was just told that my comment was too short! LOL! SO, how are things with your new nephew???)
Oh Kristen – that is TOO funny! Someone looking over your shoulder saying your comment is too short? 🙂
Just saw your beautiful tree…how wonderful. So happy for you.
Very cute & very PB’ish. My girls would love it.
Super cute…great job!!
Nancy
Love it, Jen! Thanks for sharing her project with us
Sooo beautiful and it just simply looks great!!
This is adorable! My daughter would love it. Your blog is so inspiring. Please let us know how your new nephew and family are doing (if they don’t mind). I am so happy for them all….even though I don’t know them! Such a special story.
I like yours even better than the original. 🙂
That is SUPER cute!! And such a versatile idea, as well.
Oh Jen! This is gorgeous!!! My daughter and I were just admiring (but never buying from) the PB magazine. Yours is much prettier!
How beautiful! And I LOVE the price!
Wow. I absolutely love this! I found some nylon butterflies at the dollar store that I put around in Chloe’s room (You can see a few here: http://www.beautifulcalling.ca/2009/04/makings-of-big-girl-room.html
She outgrew her Nemo stickers so with those gone, this would be perfect. And I agree with previous commenters…I’d choose yours over PB even if they cost the same 🙂 It’s beautiful!
Jenn – your daughter’s room is beautiful. GREAT JOB and this chandelier would be perfect in it. 🙂
I LOVE it! I’ve thought about trying to imitate this design, but thought it would be too difficult. Your tut is awesome!
I did a pottery barn butterfly room for my daughter earlier this year.
3 posts…in case you’re interested
http://moodygirlprojects.blogspot.com/2009/05/tessas-room.html
http://moodygirlprojects.blogspot.com/2009/05/inspirationimitation.html
http://moodygirlprojects.blogspot.com/2009/05/desk-refinish.html
WOW! You are so inventive! What a wonderful addition to a little girls room – I might have to tuck away this idea for a few years down the road! 🙂
Super cute! Thanks for the tutorial!
Simply beautiful! Tucking this one away in my favorites folder so I can do it later!
so,so cute!! i am filing this idea away at thecraftersfilebox.com.
thank you and ms. cara for sharing!
I love you for posting this! I am totally making this for my daughter. I think this would make great gifts for her close girlfriends, as well!
Beautiful! My little girlie would love this!
I’m posting a lot of frugal hand made gift-giving ideas at my holiday blog. Come check it out: http://www.2008jessetree.blogspot.com
Lovely! Thanks for the instructions.
Thank you so much for sharing this idea! I just typed in “make the pottery barn capiz chandelier” into Google and you had the answer. Would never be able to afford the one from the catalog. Now my daughter and I can save money and enjoy making something together.
I love the hanging butterflies. Those would go great in a kids bedroom.