
There’s something about a clean and orderly pantry that just takes my breath away.
Since I shared on Day 1 of our Clutter Countdown challenge that I am going to be quite vulnerable in this series, my pantry is a constant source of agitation and I know it doesn’t have to be. The key is just taking the time to declutter and set up a system that works for our family. For today’s challenge, tackle your worst shelf in your pantry and stick with it until it’s done.
First, let’s just stand in awe of my this organized pantry. Yes, inspiration from the Container Store does my heart good. 😉
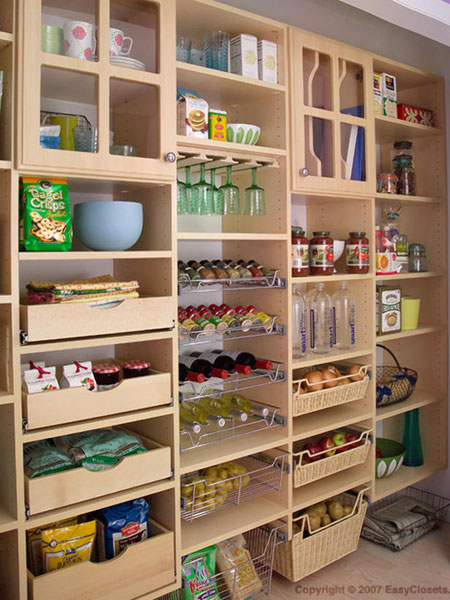
And this dream storage unit from Easy Closet? Be still my heart.
At the end of the post, I’m sharing my pantry reality. For this Clutter Countdown Challenge, I worked with what I already had on hand and I am proud of the progress I’ve made.
I’ll admit that additional pantry storage is on my Top 5 Home Reno projects I’d like to get done in the next year. This past week, I’ve only worked on my main pantry, I also have another one under the stairs that needs some more structure and I know that it will be worth the investment to implement a few storage options.
Are you ready to join me? Set that timer for 15 minutes and work as fast as you can.
Here are my Realistic Pantry Organization Tips.
1. Determine your family’s needs
I’ve never been one to state “Your Guide to the Ultimate….” because every family and space is so different. Some have teeny tiny pantries and so for them to have functionality and adequate storage, they may need to claim additional space from another spot. Some have massive areas and have found that with more space, comes more pantry clutter.
I have always been a stockpiler of groceries, so I’ll never have that clean and open pantry look. I’m not the Doomsday Prepper (fact or fiction) kind, but a Stockpiling 101 kind of girl. While the stockpiling benefits allow me to avoid any impulse purchases, buy at rock bottom prices, plan my menus based on what I have on hand in my pantry and freezer, as well as the freedom to completely avoid the grocery store for a week, it also has a few downsides for those of us (ME) who aren’t a Type A organizer type.
If I don’t have the pantry organized, I waste and then the savings is cut in half.
Determine what your biggest issue is in the pantry. Ask yourself what keeps you from it being organized and address those issues.
2. Clear the shelves completely.
Whenever we have to tackle a high traffic area, it’s important to remove all the contents first. I wish I could say this was a 15 minute job, but as you will see from my full disclosure picture at the bottom of the post, this was a take a shelf a day at 15 minutes project. It took my about one hour total, with one more shelf to go, but wow, it feels SO good. It had been TOO long since I had tackled this chore and by avoiding it, it grew and grew. Procrastination never prospers (except with clutter.)
3. Purge, purge, purge.
As with our other spaces, be ruthless. Don’t let the frustration get to you like it did me. Make room to breath. 🙂
You will see in that picture below that we had 3 bags of opened tortilla chips, stale crackers, chips opened and not sealed etc. Our open floor area in the pantry became a shove it and go spot for the kids and general free for all. If they couldn’t find an already opened snack of choice, they went for another one, leaving the open ones to go stale. That can’t continue.
Now, I am not passing blame because I needed to set up a better system with our snacks and by freeing up space in the pantry, then everyone can find things much easier.
4. Clean everything.
Since I have those dreaded wire shelves, I don’t have the crumbs to worry about, except on the floor. Make sure you vacuum well, get the crumbs up, spray and scrub everything down. Get the baseboards, corners and if you are blessed to have “real” shelves, this is the time to replace or add contact paper or shelf liner to make clean ups much easier.

Amazing pantry redo at the Social Home
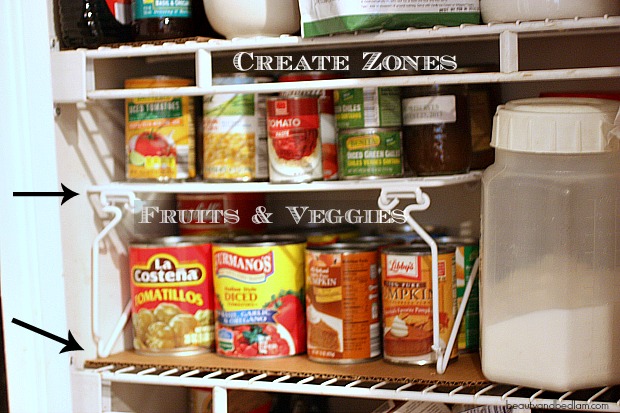
4. Create Zones
As you begin to place items back together, don’t get caught up yet with all the pinterest perfect pantries that have everything labeled and stored gorgeously. Focus on the first things first, which is getting a system that works for you. I dream frequently about my new pantry, but for now, I am thankful for what I have and need to utilize it to it’s best ability, decluttered and functional.
Identify the most used items in your pantry and keep “like items” together. This is the most important step as you put all your items back.
As you declutter, you may find unused organizational bins or baskets that you can use for the pantry, so shop your house first. I had miscellaneous plastic storage containers in the back of cabinets that weren’t being used and found some toy bins in the attic.
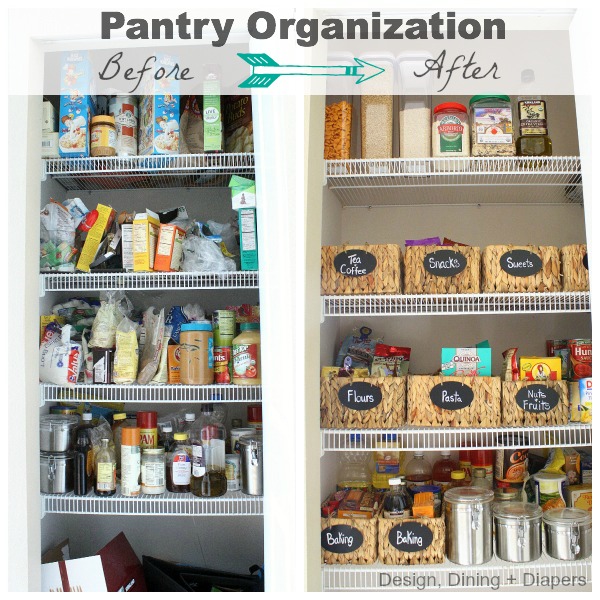
Design, Dining and Diaper’s pantry is nearly identical to mine. I love how she tackled her shelves by using baskets. Definitely check it out. She did an amazing job and it’s realistic because many of us have similar pantries.
There are many ways you can divide your pantry into zones and it depends on what works for you. I actually have an area just for my 10 minute dinners , I keep the quick meal staples in one spot. (I will do a separate post on that, along with a pantry list of what to stock because it’s a lifesaver.)
You can have a zone for baking and cooking, snacks, canned veggies and fruits. I specified an area for all our condiments and open bottles like honey, syrup, oils etc. I set them on a piece of cardboard to catch any drips. That makes a huge difference.
Determine how you cook or what you cook most and organize your zones that way, if that works. I have one whole bin now just for tacos, soft tortillas and flat breads. You can organize one bin for quick breakfasts, school lunch snacks etc.

5. Utilize all the Space
Sometimes pantries have wasted space and it’s up to us to get creative.
Due to the set height of shelving, there’s always a lot of unutilized space on my shelves. Look at the pantry previously pictured. There’s a ton of extra space above her baskets, so how can we best utilize that space?
I’m looking for better storage solutions and while I don’t want to spend a fortune, a few items make all the difference. I bought an extra wire rack and love it. I wanted to give it a test run before I bought other organizers, but I definitely will because it makes it so much more functional.
(Yes, became I am so fancy like, I used a cut up cardboard box to create a place to put the shelf. If I had a small cookie sheet, that would have worked well too.)
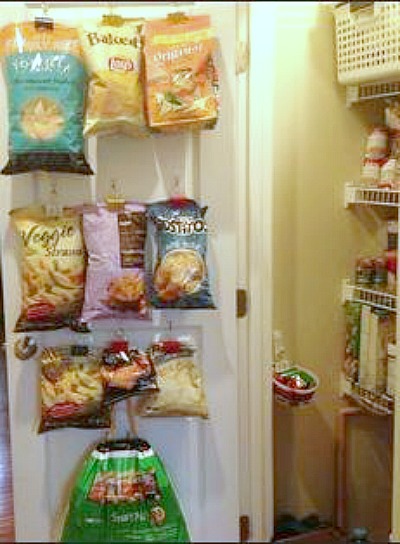
I love all the 3M Command Hooks and use them for lots of storage needs. It’s amazing how just by adding extra hooks on the wall can do so much double duty. I have two hanging right inside my pantry, but this is brilliant to use them for chips! (I wish I could give photo credit but I found this fuzzy picture online without a source.)
6. Finish and then Label
When you are completely finished with that first shelf and marvel at your accomplishments, then take a minute or two to label items on the shelf. Don’t get intimidated by this.
Honestly, you can do it with cute chalk board labels or just take masking tape. No pressure. Just do what works, then program yourself to place like items where they belong. It will take awhile to create that new habit, but we can do it.
Ok, so here’s the progress I made. There is still more to do, but I reclaimed the floor, and “shopped my house” for some organizational help.

GASP! Dying of embarrassment, so I hope it encourages you that we are in this together. Yes, that is the shove everything and go floor area. With five kids, we’ve done more shoving and going than I care to admit.
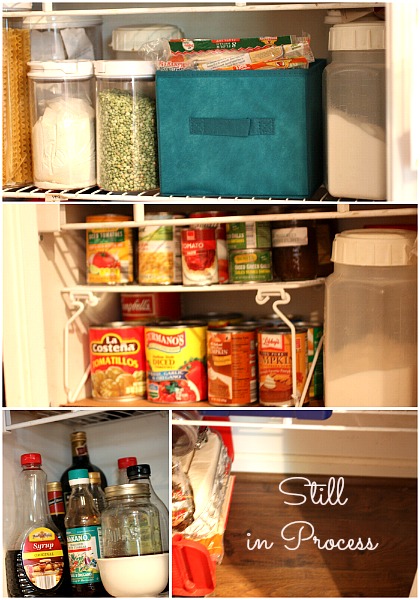
Oh my word!! It’s SO much better. How could I have put this off so long? I know you are tired thinking of starting to tackle your pantry, but I promise you, it’s SO worth it!!

Do you recognize the white milk glass jars? Yes, those are the ones I cleared from the kitchen counters on Day 3. I just LOVE how it’s all coming together.
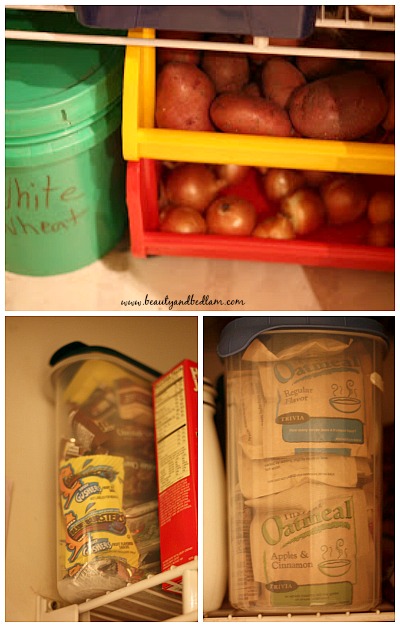
There’s nothing worse than the smell of rotten potatoes and I’ve lost too many bags of potatoes by not taking them out of the bag immediately. Use a basket or bin to hold your onions and potatoes. I gathered oatmeals and snacks in miscellaneous dollar store bins.
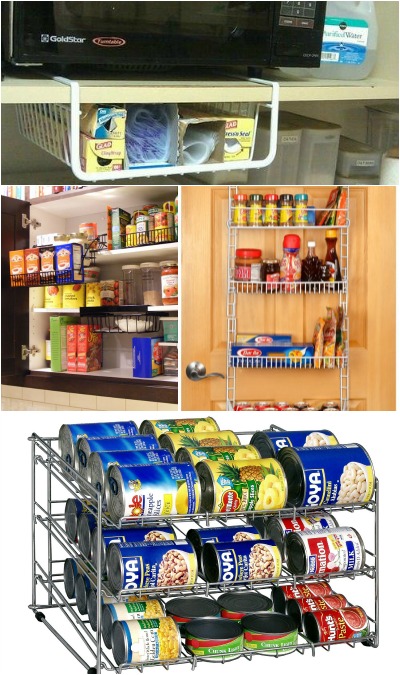
1. Pull Down Spice Racks
2. Organize your cans
Here are just a few of the organizational bins I came across that may be helpful for those short on pantry storage. I pulled these from Amazon, but I’m sure you can find them at your nearest discount store.
PHEW!!! This task may take a few days, but you can DO IT!!!
I hope you are sticking with me for our month long Clutter Countdown Challenge. Remember, just 15 minutes a day will revolutionize our home before the holidays. Follow along with our daily challenges both here and/or on my Balancing Beauty and Bedlam Facebook page, so make sure you check in with FB every evening chiming in with what you accomplished.
To read the other decluttering posts and catch up on our previous challenges, click here.
How are you doing? Chime in and let me know if you are still with me. 🙂
How have you organized your pantry? I’d love to hear the different ways.
Love the progress you have made! I live in my pantry so organization is a must for me. It can always be better though.
Helpful tip, don’t store your potatoes and onions together or too near each other. The ripening gases they give off will make the other spoil or rot faster. I keep my potatoes in a basket on the floor and the onions in over if those hanging baskets about elbow height. I use onions more than potatoes so I gave them the better spot.
Good luck!
I de-cluttered in the kitchen too – but not the pantry … MY RECIPES! Whew! Two fat binders full – all organized and sorted! I feel like super-woman (it took THREE 15 minutes sessions today).
Today I felt really brave and did 3 15 minute clutter control! Thanks Jen for the inspiration!
Ugh! I’m such a nerd! I keep my pantry organized because it becomes another job to do to clean it up if I’ve let it go astray…
Nerd? Hardly! Smart, is what I call it. 🙂 You don’t have this extra job that the rest of us do. 🙂
Didn’t do the pantry today … don’t really have one, most foods have a spot in the kitchen cupboards (most of which my small kids can’t reach!) and two shelves in the linen closet that seem to do pretty well. Limited space means I don’t keep a too much on hand.
On the OTHER hand, my bedroom closet is three full bags lighter on the craft/fabric/sewing storage! That’s what I did with an hour after my kids went to bed.
Thanks for your honesty, encouragement and inspiration, I’m appreciating it whether or not I’m doing the same area.
I am IN LOVE with the top photo (from Container Store, I think). My pantry is L-shaped like that and my shelves are SO deep that things get lost back there. This is my new inspiration. Thank you!!!
I know!! Isn’t that pantry amazing? Well, if you have an LShape pantry, that is the perfect inspiration, for sure.
I’m still in! Wasn’t really feeling like tackling my pantry, but tackled a few shelves anyone. Took about half an hour (with the normal interruptions of being a mom), but got it done and am very happy with the results.
Thanks again! So much more fun knowing there are other people doing the same thing. I’m quite excited about what my home will look like at the end of October!
(anyone) -> anyway
YAY!! Trust me, did you see my pantry? I completely know the feeling of avoiding that mess, but I’m with you on being happy with the results. It’s unbelieveable how it adds up so quickly. I finished my utensil drawers yesterday and wow, who needs six measuring spoon sets? I guess I thought there was going to be a run on them at the store? 😉
Your pantry looks so good! It must feel so awesome! Are you inviting people over to see it?! Lol! I did with my kitchen de-clutter! I was so happy with the “new space” it created! Inspiring to see the difference with the before as well- that is what I love about your blog…it is REAL life! Thank you for sharing!
I immediately went and put Command hooks up and hung up two bags of chips! I didn’t even want to stop to leave my comment until it was done, this one is a winner!
WOOHOO!! You go, friend. You know I am all about those 5 second fixes. haha NOw I wish the rest of my house could happen that quickly, but slowly, I’ll get there. 🙂
I came to the party late from Pinterest because I need to organize my kitchen cabinets. Imagine my surprise when I saw a picture of my kitchen. Yeah, I’ve done something right! The Amazon pic of the under shelf rack was mine. I cut the ends off the boxes of ziplock bags. It might look a bit odd in the picture, but it is very useful.
I grabbed that photo right from Amazon and assumed it was their stock photo that I linked to. I sure want to give correct credit where it’s due so please let me know how I can do that. 🙂
@Carol,
I had to go back up and look at the picture because I didn’t notice that the ends of the ziploc boxes had been cut off! This has potential to solve a minor issue for me (fingers crossed). When you get a bag out of the box, does it come out by itself, or does it try to drag along some friends?
@Donna L.,
Well, that kind of depends. If they are tightly packed, you may need to use 2 hands to get just one. It gets easier towards the end of the box, and easier with practice. It’s most easy with the slider type of bag. One bonus of the open end is you notice when you are about to run out.
I organized my wire shelve pantry in a similar way. I bought the rolls of Plastic-y shelve liners. Small items stay up better. I also use a rubbermaid lazy susy in the corners. My pantry is two small walls in the corner of the laundry room. This allows me to be able to see and get to everything in those back corners with out having to pull other stuff out. I also use on in my fridge.
I have two of those can organizers from Amazon. They are FABULOUS for organizing! You have to do some assembly but they are very sturdy. There are times when I walk into my laundry room, look at the shelves, and just smile at how tidy all the cans are!
Okay, I know you said not to get fancy with labels, but as a fellow “messy-ish” homemaker, and after tons of unsuccessful reorgs, I have discovered that labeling containers/shelves, even a lazy susan makes an incredible difference in how long that tidiness lasts. Somehow my memory of where things should go never works the same way twice, and labelling has made all the difference for me. Hope that’s a helpful tip!
I love hearing that from someone who has gotten success from that. And yes, GREAT tip!!! I’m up for the challenge. Thank you. 🙂
I’m curious about something in No. 5, the picture which you show the back of the door and the use of the command products. In the closet, down towards the floor in the corner near the lowest shelf there is one thing you’ve hung in that corner near the hinges of the door. What is it? I cannot figure out what sort of item you would isolate and hang in this location. I just finished about a month ago a MASSIVE undertaking of organizing ALL of my cake decorating sprinkles, pearls, edible glitters, jimmies, sugars, confetti, herbs, spices, chocolate bits, candies for gingerbread houses, candy melts in every color, and more other things than I could ever mention here in various sizes of canning jars. I’ve been working for well over a year of changing the purpose of some of the rooms in my house, upgrading, cleaning, sorting, you name it. I renovated a 200+ year old home about 16-17 years ago which is my family’s home place. I never got all of the original things on the “to do” list and now after the wear and tear of just “life” these past 16 years it’s time some things be redone or refreshed. The oldest part of the house was built around 1795 and hadn’t had anything done to it since about 1950s. It came into my family around 1918. It usually goes without saying homes in this time frame have NO closets. It makes life very challenging. I actually took one room, one very small room which existed between the kitchen and the “front room” (which I turned into a formal dining room) into a butler’s pantry and a second bathroom. That butler pantry has been a Godsend since I had inherited more dishes from past female ancestors than I could count. I already had all of my own things so it was overwhelming. Then I had a separate food pantry which never seems large enough. You would never think a single woman with one golden retriever would need all of this would you? However, I have all the family holiday meals. I entertain quite a bit, I used to be a consultant for 17 years for a home selling business of handmaade baskets. I’ve used these baskets of all sizes, some quite large, for many storage uses over the years. The nice thing about the baskets with their lids is they can easily be repurposed and still look good. However, when not in use they do take up a good bit of room. Thank heavens I have a nice large clean attic. But the biggest challenge has been the enormous amount of supplies acquired for cake decorating and candy making. Cake pans take up SO much room and especially the shaped pans are not easily stored. Oh well, I guess we all need challenges in life to keep us on our toes but I can’t believe the stress reduction I’ve felt when I get each area organized in my home life space. It is SO worth the time, effort and expense. Good luck with all of your projects. With 5 kids the amount of clutter you have would probably give most nightmares. Kids today seem to be even worst packrats than we adults. I did learn one very important thing in my food pantry organization and that is to store the potatoes and onions in separate bins. For YEARS I kept them together and never knew this is one reason they would go bad so quickly. Since I changed that it’s been SO much better. Just goes to show we’re never too old to learn. Best of luck to you in all of your projects. If you’re like me you’ll never get bored or say you don’t have anything to do.
My 14 year old daughter just did something like this for me right before school started (right after Becoming!) in our laundry-pantry She took everything off the shelves and got rid of all the out of date/stale items and organized the remainder so nicely. It took her about an hour and it looks fabulous. I’m so proud of her work every time I walk in there. Usually, it’s my job, but she took on the task this time and I couldn’t be happier.
Now my task is our small hallway pantry where I keep extra spices, rice, etc. I have a moth infestation (!) and so I know it is PAST time for me to get in there and clean and reorganize. I’m not looking forward to it, but this has given me some inspiration…
Maybe… just maybe. 😉
That is an amazing daughter!! What a blessing!