
As the thermostat switches from air to heat, I typically get out my fall decorations and enjoy them for months. This year, however, life got away from me with my trip to Ecuador, and now I am scrambling to highlight our Thanksgiving table with some quick, easy and frugal decor.
Our first step to easy Thanksgiving table decor is to “shop your house and yard.” As much as I desire a Better Homes and Garden look, a simple approach to decorating assures us that we don’t have to be designers to create a welcoming home. I love to add more glamor than what I am showing, but my desire is to encourage everyone that with just a few extra minutes, and no money spent, a beautiful table can be set.
Everything featured, I purchased at a thrift store or yard sale for under $1.
We want to be creative for the holidays, not overwhelmed.
Open up those cabinets. What do you have hidden in your house that you don’t typically use for the table? Pull them out. Think outside the box. Bowls, cake stands, candles, straw baskets, raffia…just get the creative juices going and see what you can create.
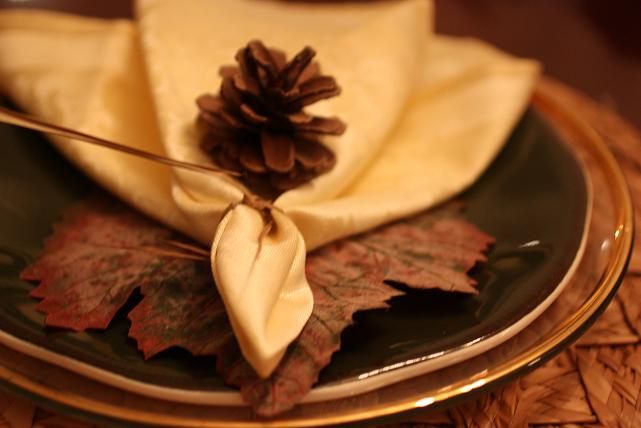
I only wanted to take a few minutes with these place settings, so I brainstormed, and pulled out straw place mats purchased at a yard sale for a quarter. I had white, black, green and glass plates to choose from, so I went with the glass and green plates and layered them. Glass plates are found by the dozens at local thrift store. The plates don’t have to match, just have fun experimenting.
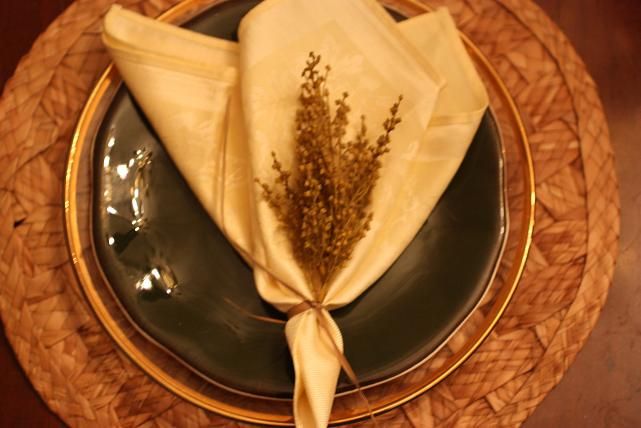
I grabbed some pine cones, leaves, sticks and other outdoor decor. Step outside and see what you have in your yard (or your neighbor’s yard). Long, skinny, curved sticks make a beautifully elegant floral arrangement. Believe it or not, just sticks in a glass vase make a statement.
Play around with what you have. I have lots more dishes and accent pieces that I would add to this, but I am demonstrating that you don’t have to spend any money to create a beautiful and easy Thanksgiving table.
I got these cute, yellow china bowls at a yard sale for a dime. It was actually an entire china set, but I only took the teacups and bowls since they were solid yellow. I didn’t like the plate pattern and she just wanted them gone, so she split them up.

In the next week or two, I will be doing an entire post with all of my favorite napkin folds. Taking a few extra minutes to learn some easy napkins techniques makes such a difference. It tells your guests they are extra special. The one I used above takes seconds….literally. I don’t know if I should really share it as a “fold,” more like a “grab.”
1. Lay out your napkin. The official hostess in me says to iron your napkin first, but often, there isn’t time. If ironing is a deal breaker, just don’t do it. 🙂
2. Just grab and lift at the center of the napkin and it will naturally fall like this.
3. Place the small end in a napkin ring, or tie with raffia, ribbon, burlap etc. That’s it. You’re done. 🙂


This is all about having fun creating without pressure. Creating an inviting home, not a spending one. 🙂
The picture below doesn’t quite capture the look, but with all the places set like this, it was really fun. Placing wooden name placards on top of the napkin would finish the look.


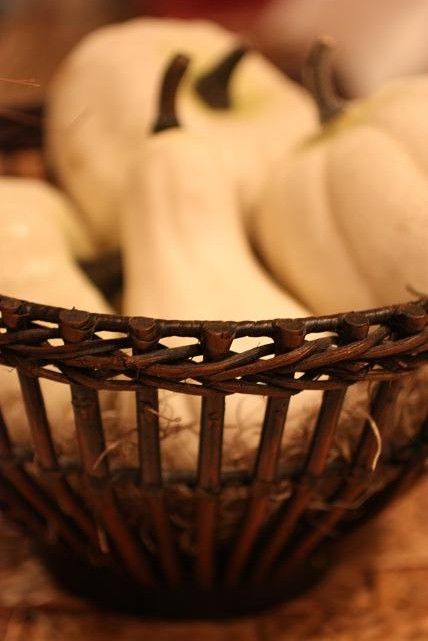
I’m off to work on the rest of my table, am am straying from the typical orange pumpkins and foliage. Earlier, I bought a few white pumpkins at the Dollar Store and I have gone to town with my Heirloom White Spray Paint on anything else orange.

Housing some pumpkins under my glass cloche makes my cake stand happy.

Grab those thrift store bowls and create something new with your easy, frugal Thanksgiving decor. I had fun and it only took me ten minutes.
You can do it too.
Love it! Check out my Thanksgiving Centerpiece — frugal style!
http://www.happyhousewifelivinglife.com/2009/11/frugal-thanksgiving-centerpiece.html
Very nice!! I have been doing some experimenting as well! Love finding things on the cheap! Thank goodness for yard sales and thrift stores!
Love it, Jen! I’m a simple girl and enjoy simple decor so this is a perfect tutorial for me. And your table looks fabulous!
This is a great post, Jen! Please, please, please share more of your napkin folds. I love to use cloth napkins (although I rarely use napkin rings. . . maybe I should re-think that!). It will be nice to learn some ways to make the napkins prettier at the table.
Right now I’m shopping my yard for “lovely botanicals” (sounds good, doesn’t it?) to include in Christmas arrangements. But I need to leave some of them out for the Thanksgiving table. Thanks for the inspiration!
Just lovely Jen!! Love the napkin ideas — I need those. 🙂
Great ideas, thank you!
darling as always. and the natural feel makes it look so classy! 🙂
I love this approach!! Makes it so much easier and forces one to have a creative eye! Looks beautiful! Janell
It looks great, Jen {as always}. Thanks for the inspiration. Having just moved AND hosting Thanksgiving here, I desperately needed some easy {and inexpensive} ideas.
We got napkin rings for our wedding. I’ve never used them! {gasp} I should!
What great ideas. You are always so smart.
I love EASY!!! and INEXPENSIVE!!! ways to decorate. THANKS!!! for the ideas.
Geri
I love the pumpkins under the cloche. 🙂 Question for you…I’ve updated my blogroll with your new site address (and saved it!!!) a million times, but it keep redirecting to your old blogspot address. Has anyone else had these problems since you switched over?
So simple and pretty!
Beautiful! Thanks for sharing!
Oh, Jen, I have missed your posts so much! I have been uber busy with tasseling and Etsying, but I will keep reading when I can!
BTW, are you going to Relevant next October?